Carving with a CNC milling machine in wood
For a long time, we have been receiving questions from you regarding the possibilities of working on CNC milling machines. Many people have asked the same question: "can with a CNC milling machine only cut through"? Watching our videos on YouTube, many of you probably concluded that the milling machines offered by V-SLOT Polska may not allow you to create spatial figure, sculptures, and more projects like that. In this article, we will show you that the milling machine allows not only for cutting out unique shapes, but also carving in materials and creating unique and individual projects!
Relif - a bas-relief made on a CNC milling machine
In this first article, we will describe for you how to make a bas-relief using the Fusion 360 software and CNC milling machines from the V-SLOT Polska store. So far, many of our clients have purchased CNC milling machines on which they are creating beautiful architectural decoration designs and more.
A CNC milling machine gives us many possibilities, but everything always starts with the model design and creating the right program settings for the milling machine.
As probably many of you already know, we recommend fusion 360 software where we can create a model from scratch or, for example, we can download the model which we want to make and then import it to Fusion 360 where we will create a milling program. At the outset, we kindly invite you to watch the video of this trial on our YouTube channel. We also encourage you to SUBSCRIBE to the channel and don't miss any future movies!
A very important aspect is the selection of appropriate cutters so that the model made by the milling machine requires processing as little as possible.
We will also mention here, that due to numerous inquiries about accessories for milling machines, we decided to introduce a new category tab in our store, where you will find amateur and semi-professional cutters, which especially for a beginner, should not burden the budget and at the same time will allow for learning and carrying out many interesting projects.
Thus, we have to point out here, that we have tested many possible solutions and cutters in the company. Learning how to mill is a really long process and we also are learning ourselves with each new project. Remember, always is right time to improve your milling skills!
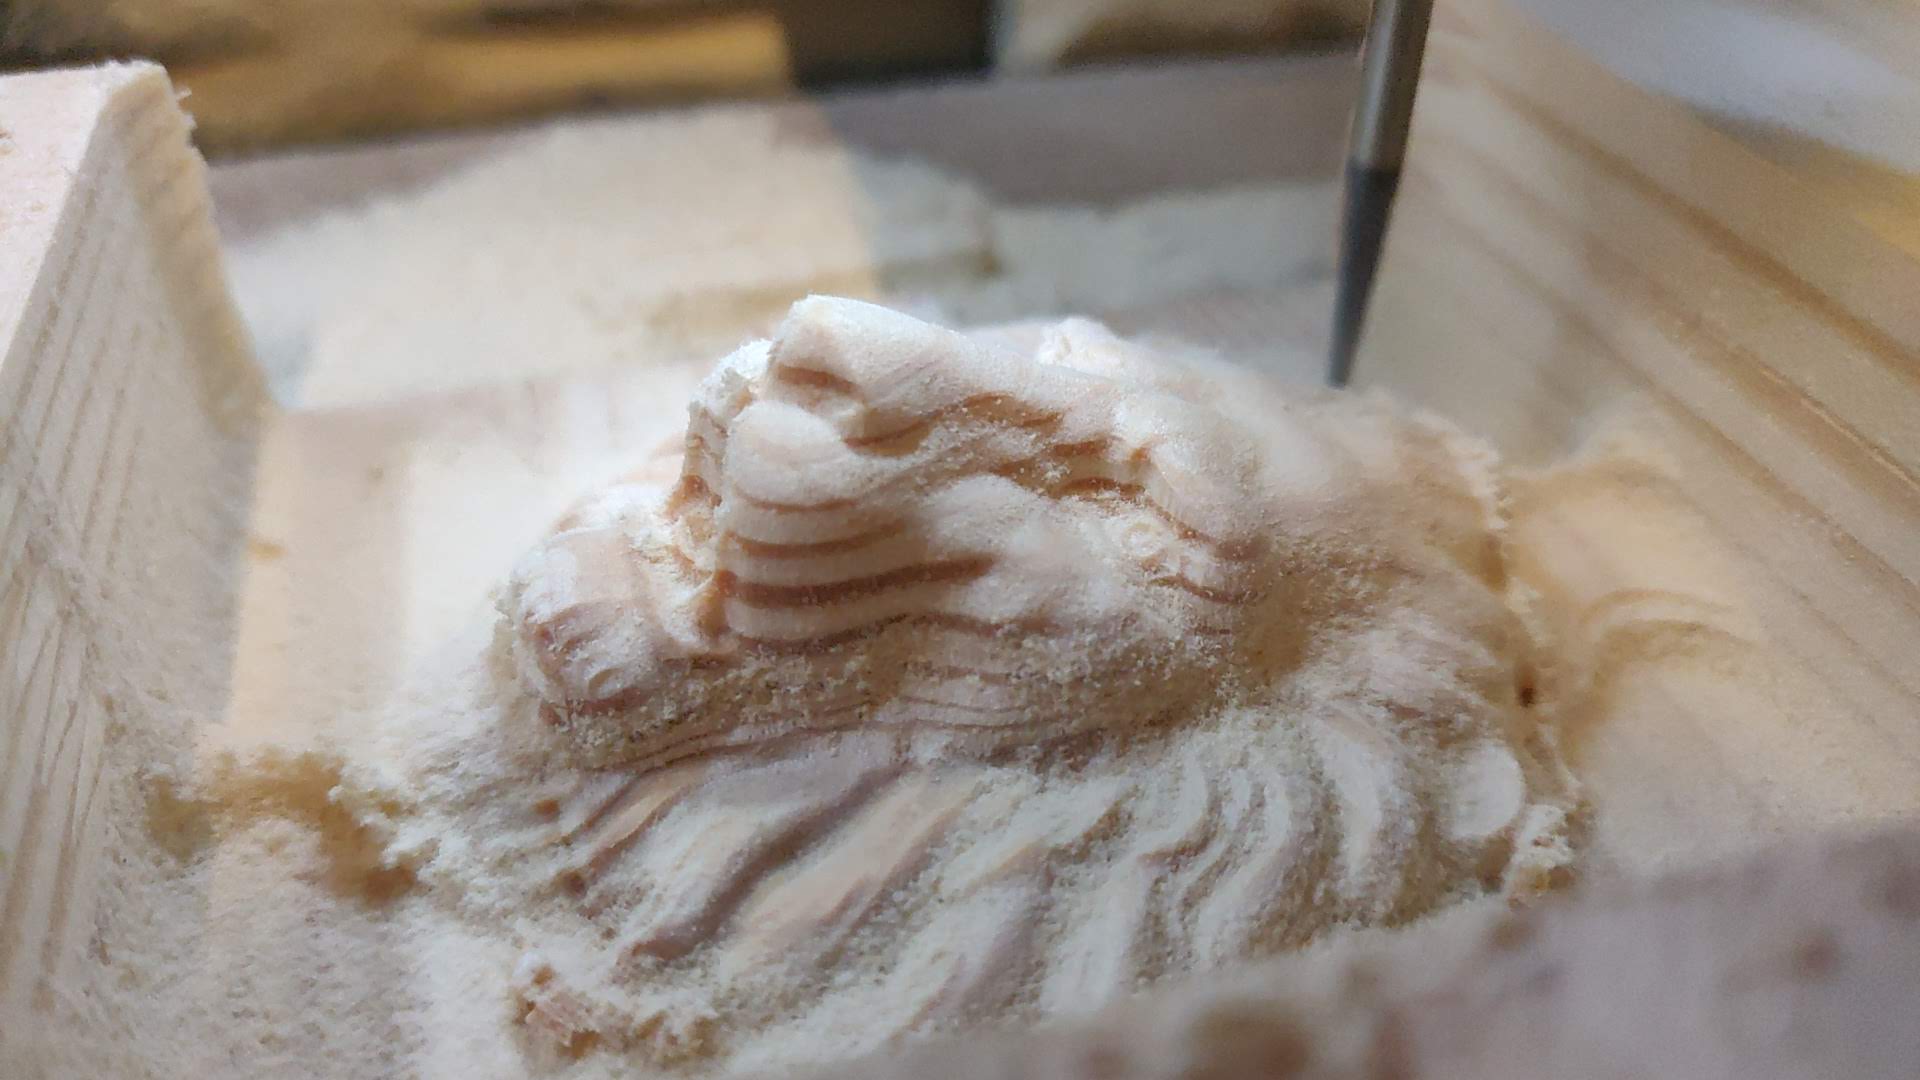
In this article, we will present how to make the small bas-relief visible in the photos and videos which was previously created. What functions we had used in the Fusion software and what cutters were used.
Where Can I download interesting projects for CNC milling machines?
Since creating a unique model of a bas-relief is a process that requires a lot of time and skills, today we will focus on ready-made models.
We will recommend several portals where you can download interesting 2D / 3D models, which after downloading in the appropriate format, you can import directly into Fusion 360.
- Thingverse Portal ( https://www.thingiverse.com/ )
You will find here a lot of interesting projects, mainly directed to be made on 3D printers. Nevertheless, on this portal you will find also projects prepared for carrying on CNC milling machines. With a little work, many of them can be processed and prepared in this way to make a model for a CNC milling machine. - GrabCad Portal (https://grabcad.com/)
Here you will find a lot of interesting 3D models. Many of them are available in an importable and customizable format readable end executable for fusion 360 software.
The lion model which we used as an example to describe in this article probably comes from the GrabCad portal, however (shame to admit) we will not give you the source. This is because it is difficult for us to dig out in the memory, when and from where the model was downloaded (if our memory comes back, we will put a link here)
Nevertheless, you can download the model from our website by clicking here on the LINK.
How to import the model to the Fusion 360 software
Since we imported the model to Fusion 360, the process is quite trivial, however, for people who did not import files before, below we shown a few screenshots where you will see how to do it.
-
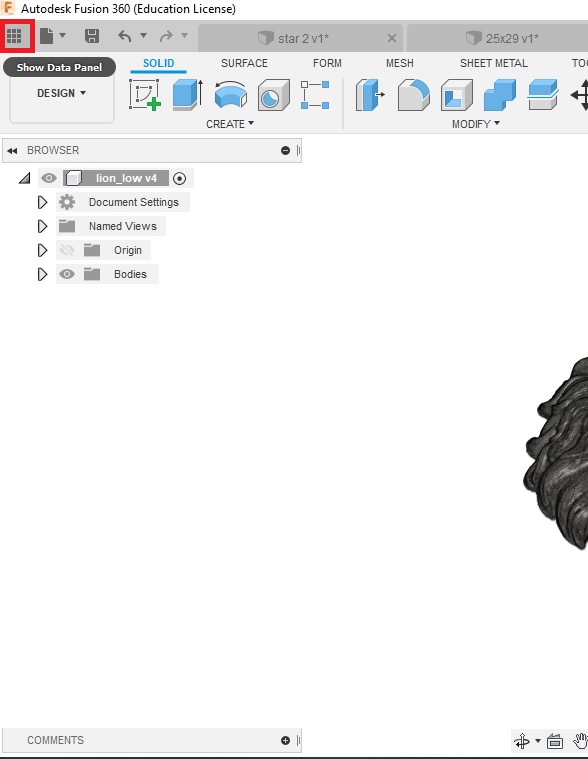
After launching the fusion 360 software, we expanded the menu where our models, folders and projects are located. The upper left corner of the screen (small squares) where, after hovering over with a mouse, "SHOW DATA PANEL" will be displayed.
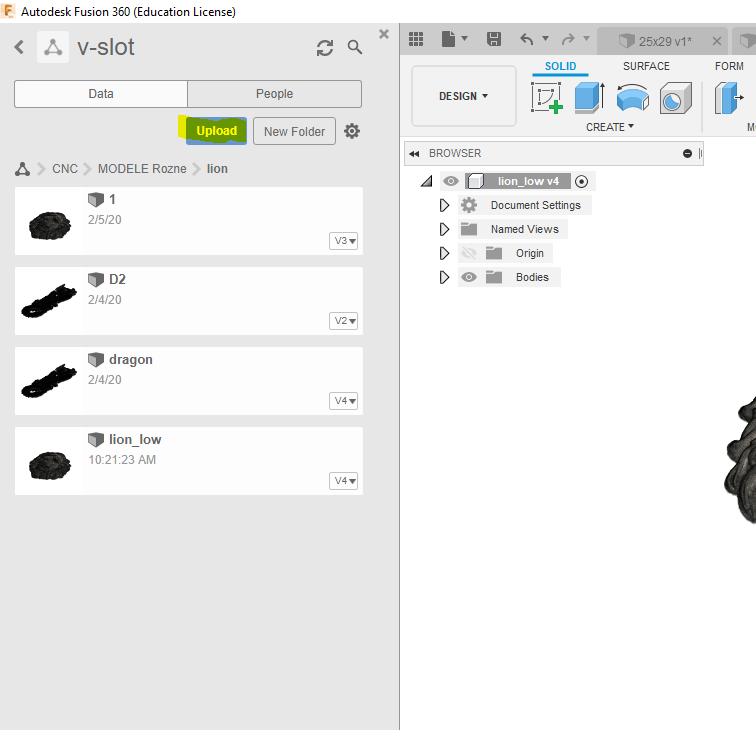
- Then, entering the appropriate folder, to which we want to import the previously downloaded file, click the "UPLOAD" button and that will open another window to which we can directly drag our file from the folder on the computer. Do it by clicking "Select files" and go through the system tree and select the appropriate file. After selecting the file, click "Upload" and wait for our file to load. When the file is loaded open it by clicking on it twice.
- When our model is opened, we can go to the Manufacture tab and start creating the model.
ATTENTION! The model downloaded often has to be, for example, scaled so that its dimensions will be adapted to the capabilities of our machine.
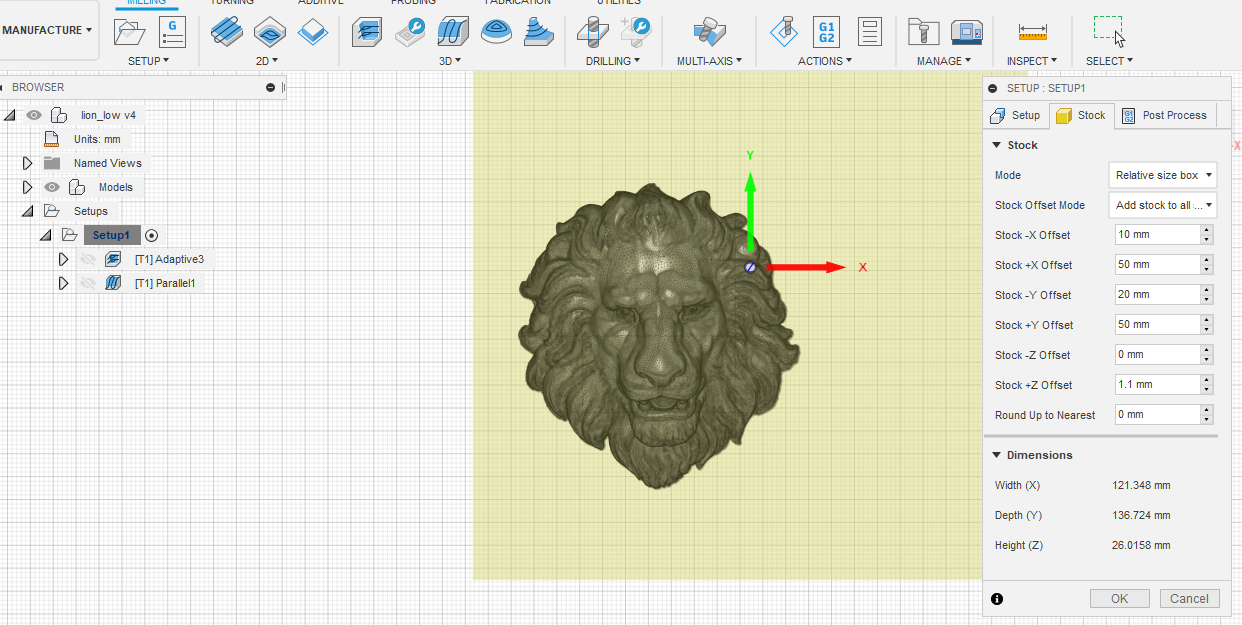
In the manufacture tab, we create the entire milling program. If you download the lion model from this article, you should already have most of the parameters entered.
We made the model in a piece of pine board with a thickness of 26 mm and dimensions of approximately 121 x 136 mm.
We indicated in the software that we would place the cutter in the canter part of the material.
-
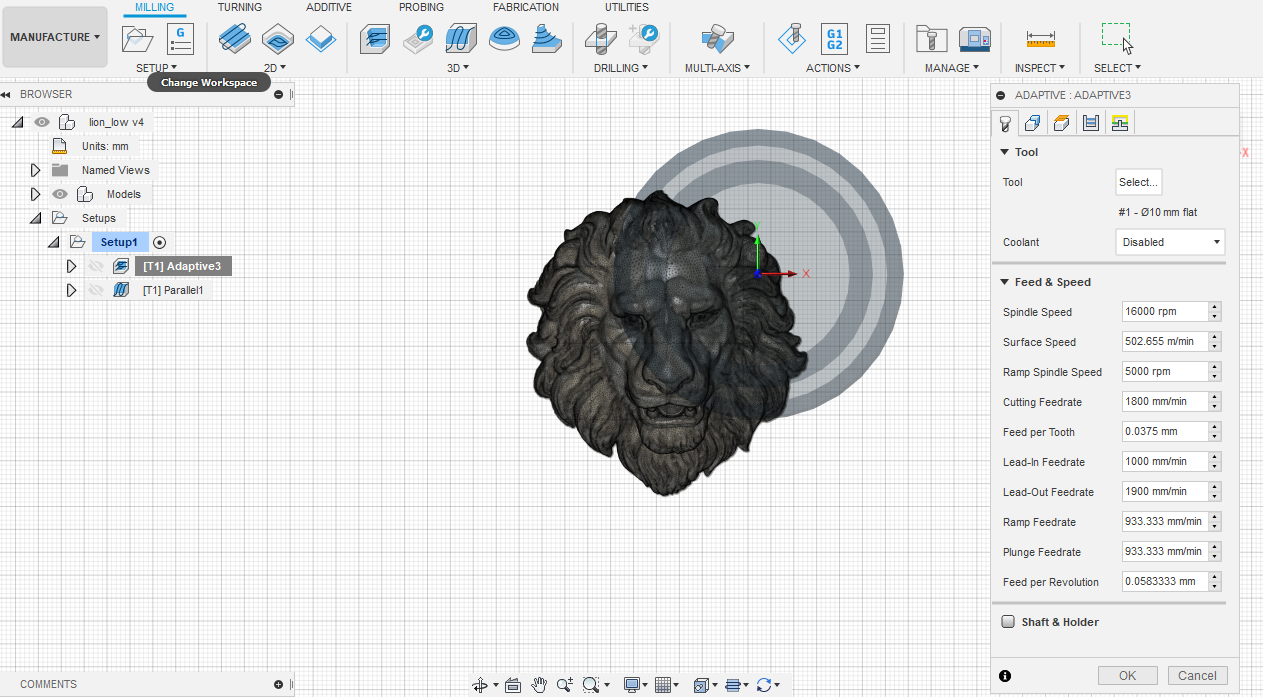
Since our lion model is not large, but it is quite "deep", requires collecting a large amount of material. In the first place we used the "Adaptive Clearing" function in the 3D tab. For this first step, we used a flat cutter with a shank diameter of 8mm and a cutter diameter of 10mm.
You will find this milling cutter in our store by clicking on the link - 10 mm wood milling cutter.
Of course, you must first add this cutter to the cutter library in fusion 360.
Adaptive Clearing Function
After entering and selecting the cutter in the Adaptive Clearing function, we must set a few more important parameters,
- "Tool" tab:
- Spindle speed: 16,000 rpm (set the DeWalt milling machine manually at level 1)
- Cutting Feedrate: 1800 mm / min
- Lead-Out Deedrate: 1900 mm / min
- Ramp Feedrate: ~ 900 mm / min
- Plunge Feedrate: ~ 900mm / min
"Geometry" tab
- Machining Boundary: Bounding box

Another sub-tab "Heights" where we can, among the others, lower the offset in the Retract Height parameter to 1 mm. This will allow us to save quite time.
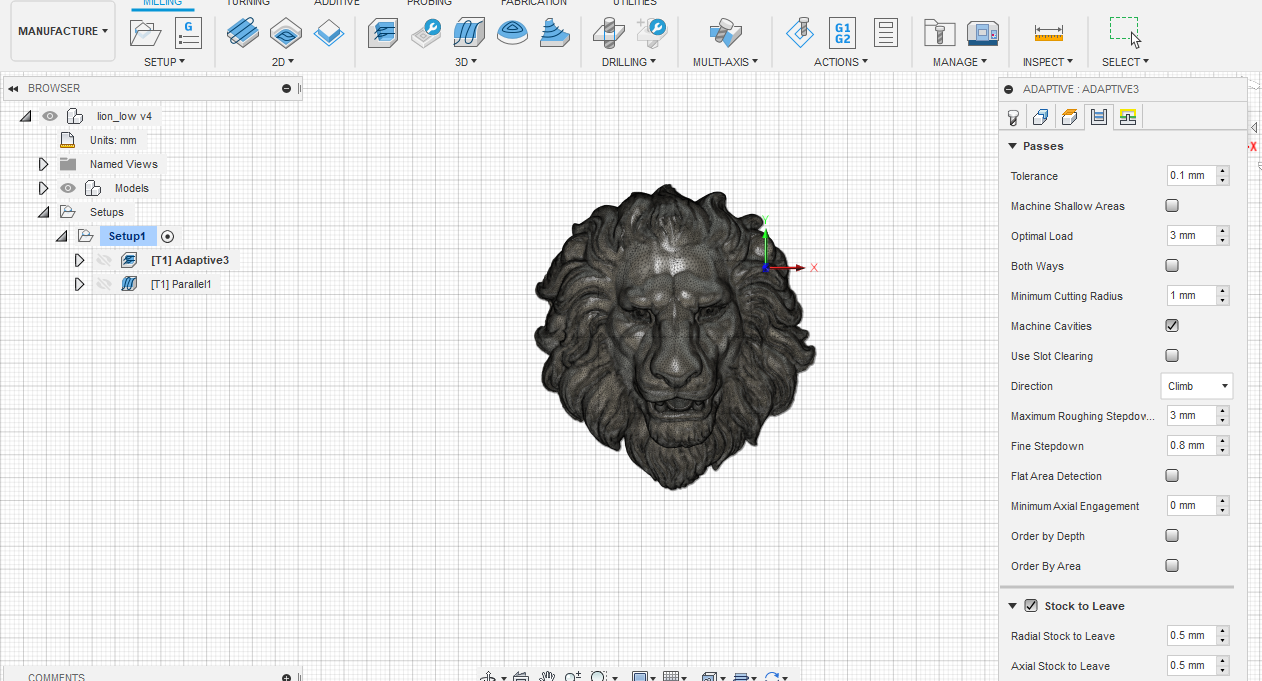
We go to the "Passes" tab where we enter a few more parameters
- Optimal Load: 3mm
- Maximum Roughing Stepdown: 3 mm
- Fine Stepdown: 0.8 mm

then go to the "Linkin" tab
Here in the „Ramp" submenu we have changed the Ramp Clearance Height to 0.5 mm
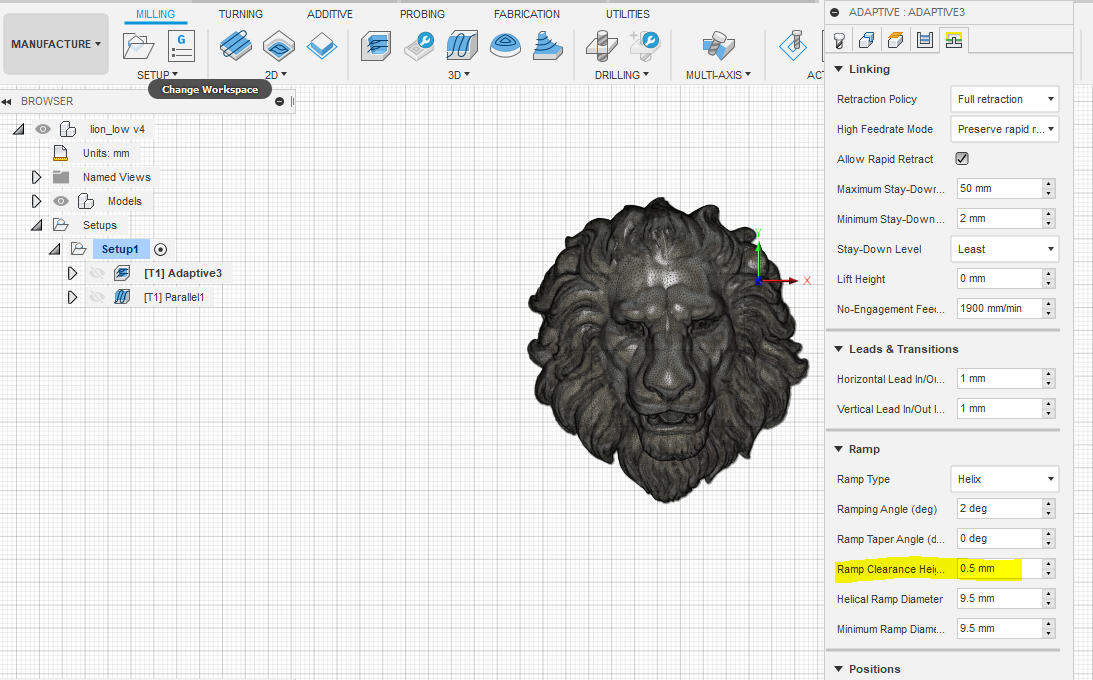
After confirming all the settings, click "OK" button, and then, in a while the program will generate the paths for the milling machine.
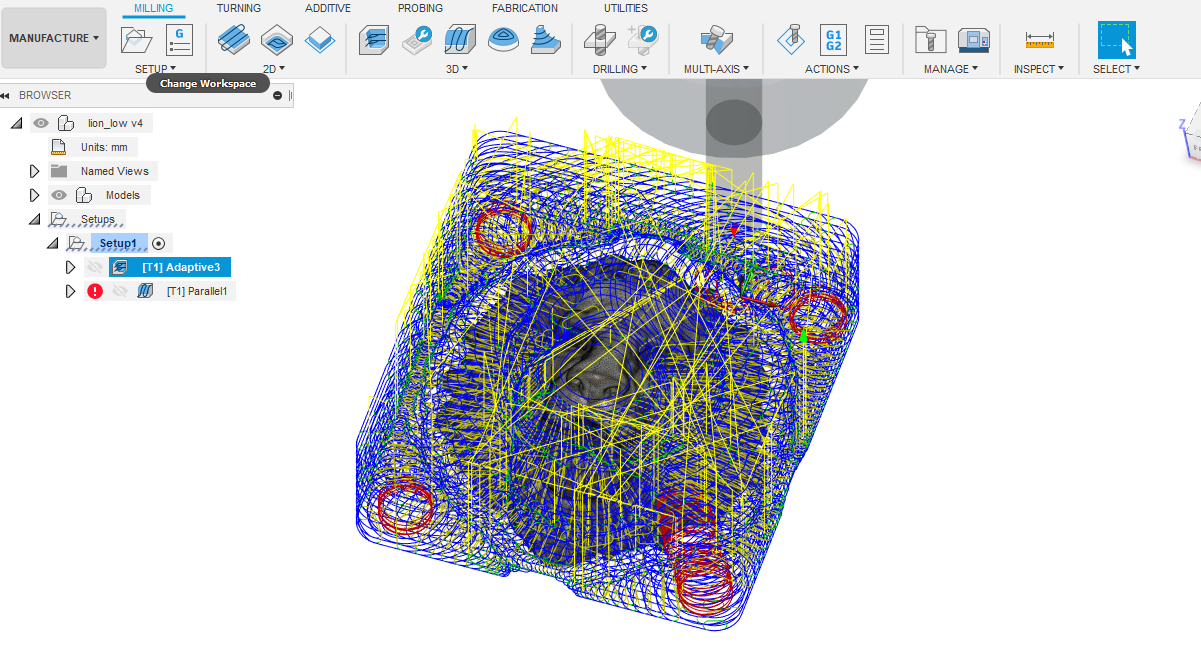
Now we will move on to the next stage of our work. - "finishing the detail".
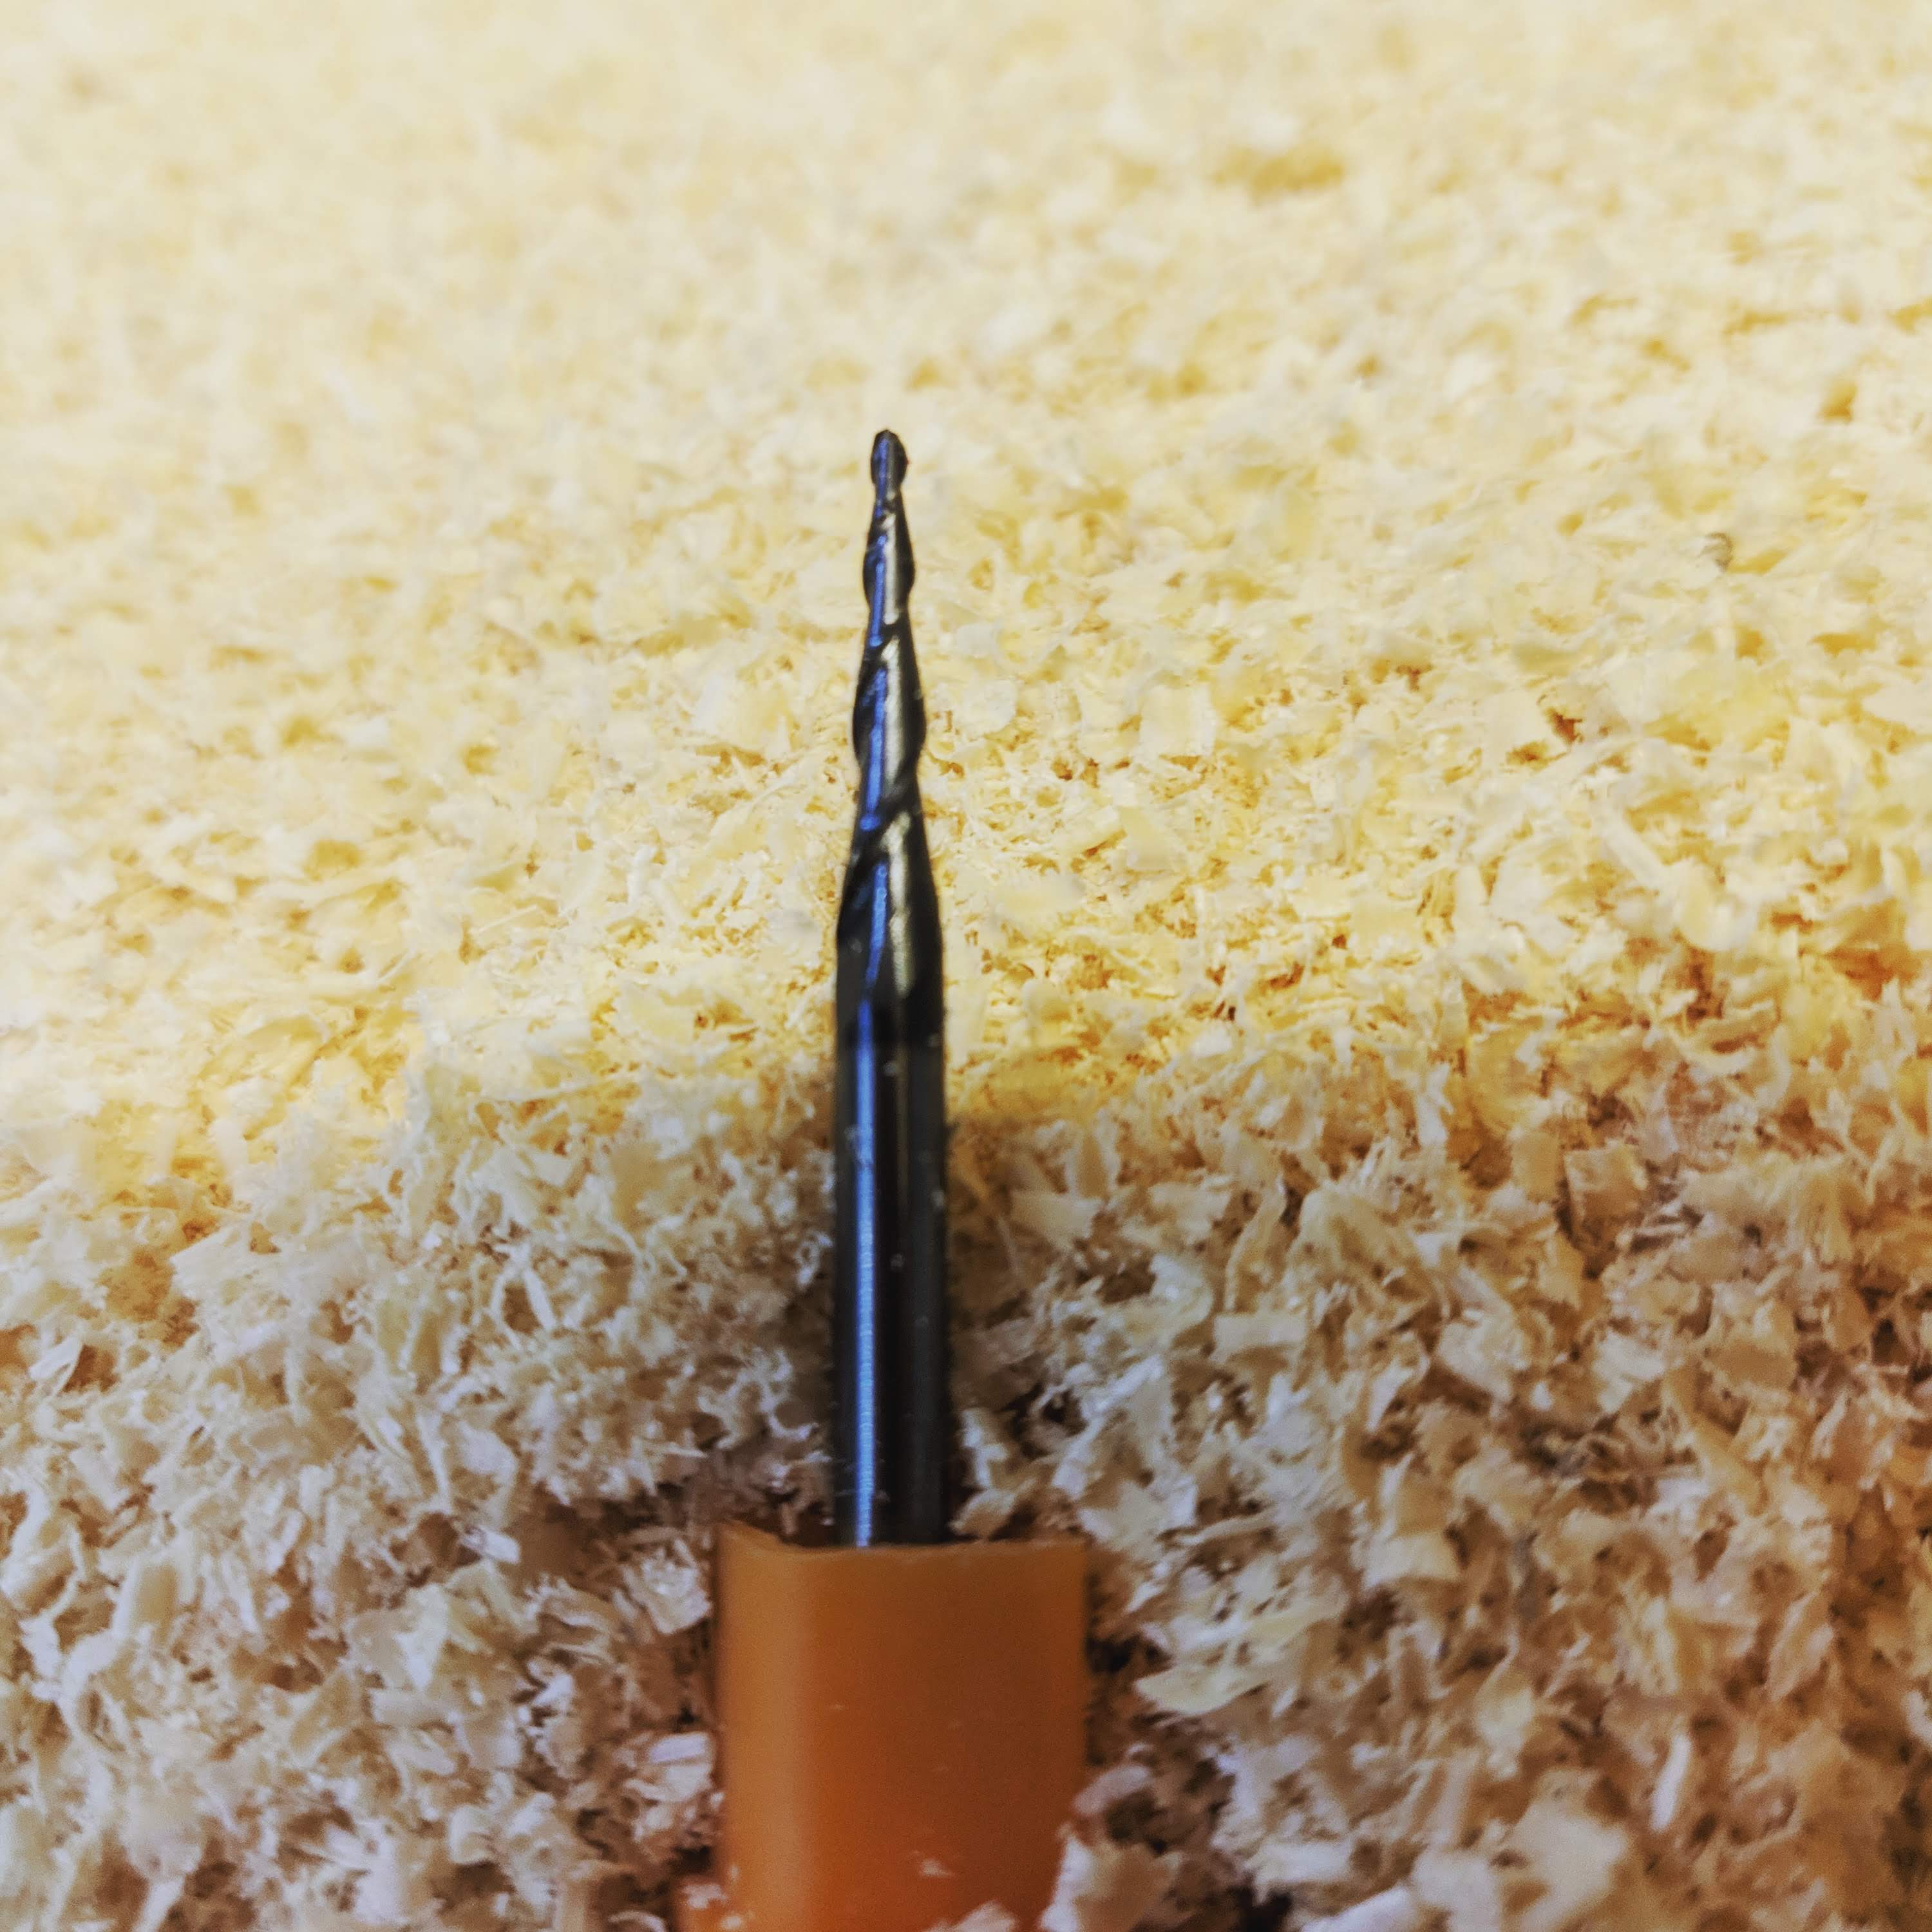
For this purpose, we will use a VHM R0.5 conical cutter with a shank diameter of 3.175mm. Remember that DeWalt has a standard sleeve which allows for installation of cutters with a diameter of 8mm.
If you want to use smaller cutters, you must buy an additional sleeve - this sleeve is of course available in our store at the link below:
BUSHING FOR DeWalt D26200 3.175mm
The milling cutter can also be purchased in our store by clicking on the link next to it: VHM CNC milling cutter R.05 3.175 for Relif.
At this stage, we will use the 3D Parallel function. Here, too, we have introduced a few parameters that I have listed below:
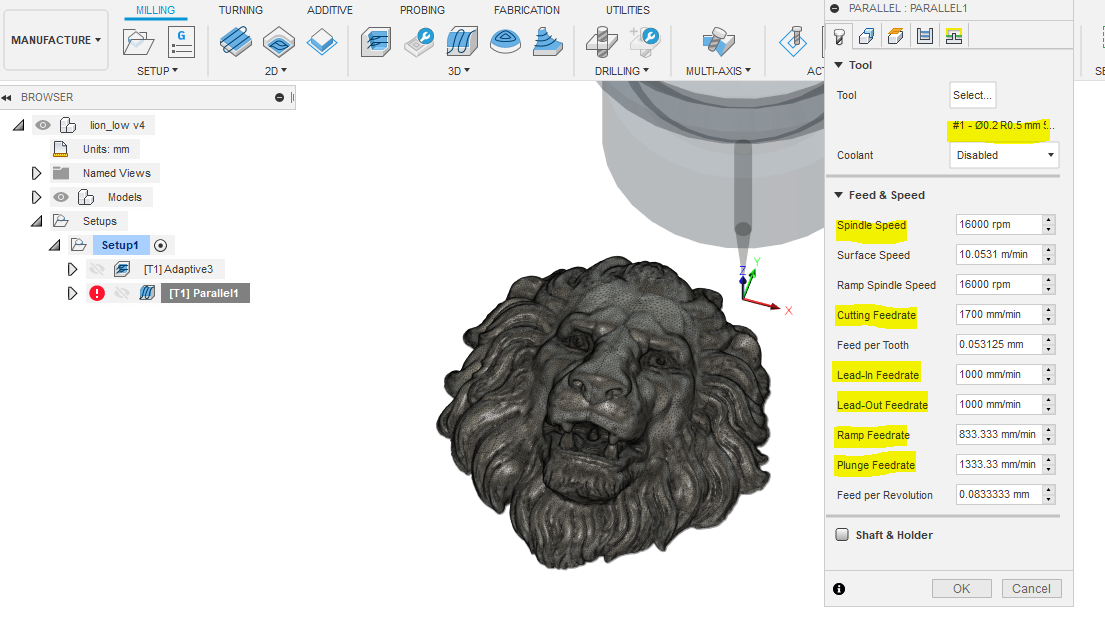
- Tool tab
- We introduce / We select our VHM cutter
- Spindle Speed: 16,000 rpm
- Cutting Feedrate: 1700 mm / min
- Lead-In Feedrate: 1000 mm / min
- Ramp Feedrate: 833 mm / min
- Plunge feedrate: 1333 mm / min
- We introduce / We select our VHM cutter
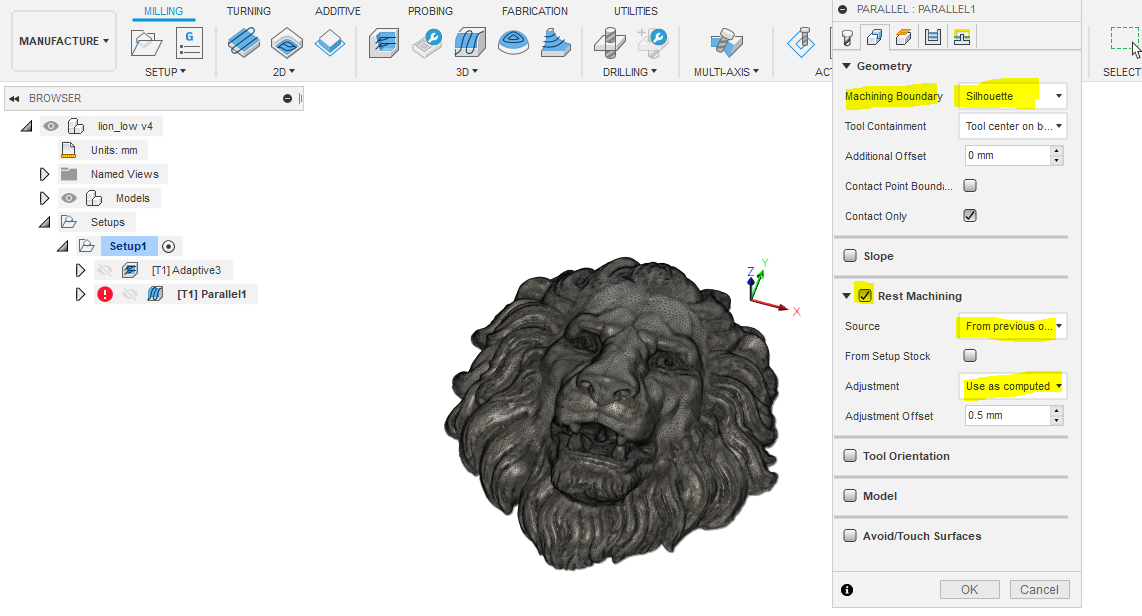
- Geometry tab
- Here we mark Rest Machining and in it
- Source: From Previous operation
- Adjustment: Use as computed one
- Geometry:
- Machining Boundary: Silhouette
- Here we mark Rest Machining and in it
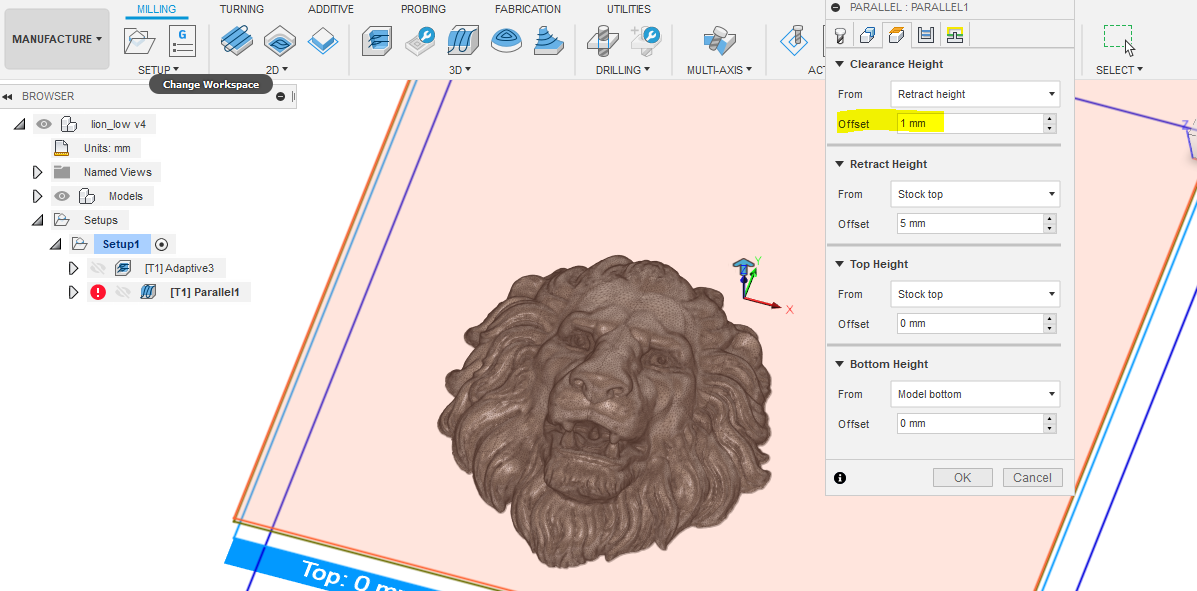
- Heights tab:
- Clearance Height
- Offset: 1mm
- Clearance Height
- Passes tab
Here, in the Stepover parameter, we enter 0.1 mm (the less, the longer the milling process will take, but the detail will also be "prettier" and more accurate.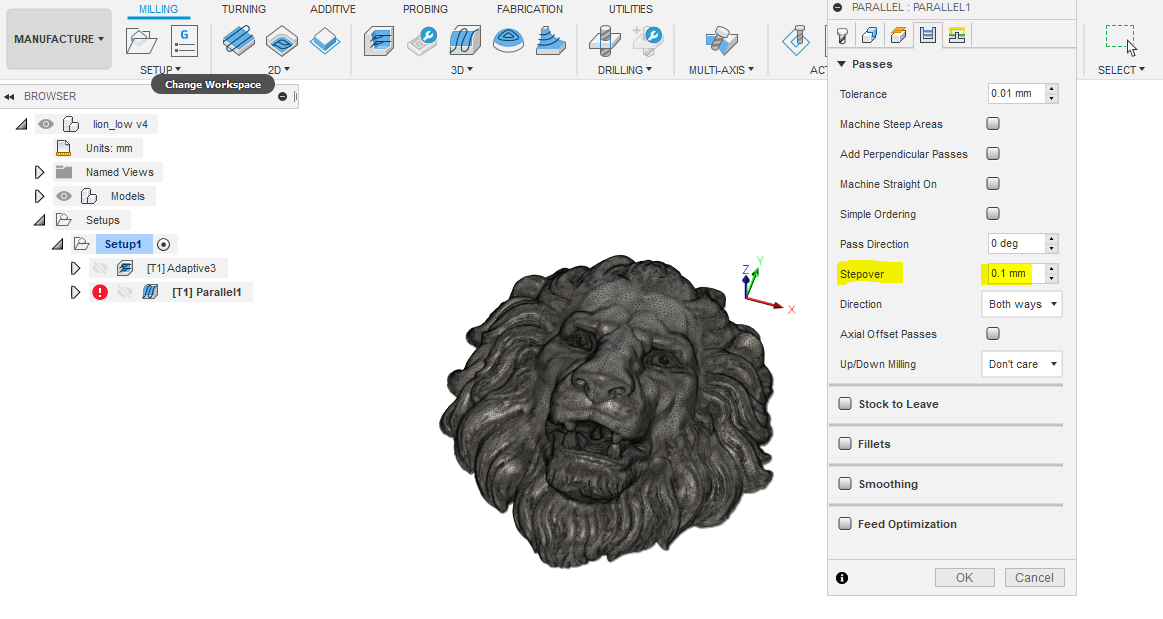
After entering the parameters, confirm everything again with the "OK" button and wait for the program to generate the paths.
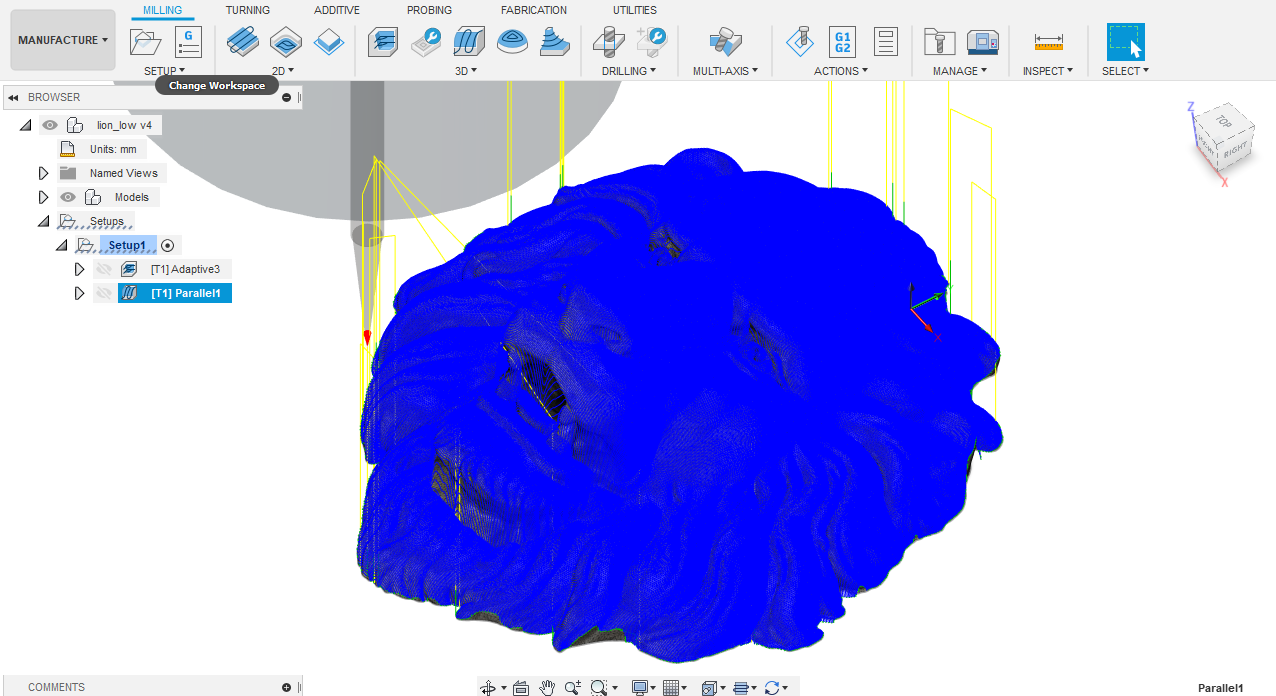
And finally, now, if everything went well, we could move on to saving programs and milling.
ATTENTION! Since we are working on 2 different cutters, we should save the data separately for the Adaptive Clearing function and separately for Parallel one.
To do this, right-click on Adaptive and then select Post Process and save our file on the computer by clicking on "Post". Also remember to select the appropriate configuration file (we have WorkBee - Duet / WorkBee - Duet)
We will call the program - LEW1-mill10mm.
You can also download the program from our website by clicking on LINK ADAPTIVE
We do the same with the Parallel function
You can download the program from the website by clicking LINK PARALLEL
Now we can go to our CNC milling machine, install the material and the 10 mm cutter, set it centrally as indicated in the fusion 360 program and run the OpenBuilds Control software.
After setting the cutter in the appropriate point, we have to reset the position of the X / Y / Z axis in the software and load our file "LEW1-frez10mm.nc”. After turning on DeWalt we can start working.
When the milling machine finishes the Adaptive milling program, turn off DeWalt, replace the sleeve and the cutter, load the file "LEW1-FREZ-VHM-3175mm.nc", set the position on the Z axis and start milling again.
After that, we should see a bas-relief of a lion!